PaddleSpeech是PaddlePaddle深度学习框架下的一个语音工具包,它集成了语音识别、语音合成、声纹识别、声音分类等多种功能。凭借其强大的性能和易用性,PaddleSpeech已成为广大开发者和研究人员的首选工具。在中英文混合语音识别领域,PaddleSpeech更是展现了其独特的优势。

在上一篇中,介绍了安装,并使用命令来生成一个音频文件,那么如何集成到我们的系统中呢?
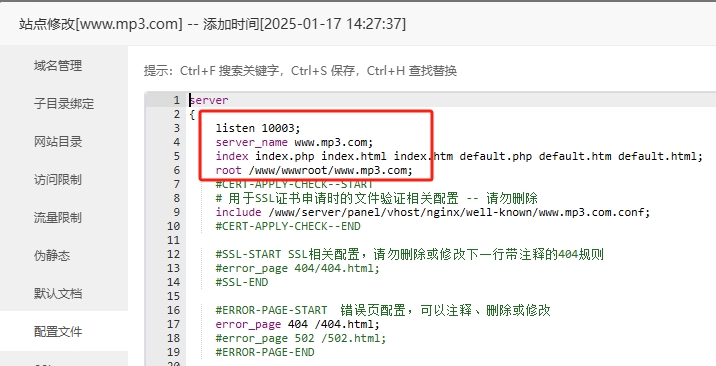
我们已创建了目录(/www/wwwroot/www.mp3.com),然后我们在宝塔上创建一个站点,站点的路径就是该路径,这样我们对外就能直接访问到生成的音频文件。

可以修改配置,调整访问的端口,这样我们直接通过IP+端口来访问这个站点

然后我们来编写一个脚本,这个脚本接收两个参数,一个是要生成文本的内容,一个是生成文件的名称,然后调用PS的命令,来生成对应的音频文件。
#!/bin/bash

# 检查是否提供了足够的参数
if [ "$#" -ne 2 ]; then
    echo "Usage: $0 <id> <content>"
    exit 1
fi

ID=$1
CONTENT=$2

# 激活 conda 环境
source /root/miniconda3/etc/profile.d/conda.sh # 加载 conda 函数
conda activate "/root/speech" || { echo "激活 conda 环境失败"; exit 1; }

echo "处理 ID: $ID 内容: $CONTENT"

paddlespeech tts --input $CONTENT --output /www/wwwroot/www.mp3.com/$ID.wav

if [ $? -ne 0 ]; then
    echo "警告:执行 paddlespeech tts 命令时发生错误"
fi

# 取消激活 conda 环境(如果需要)
conda deactivate
把脚本放到之前的(/home/www/speech)内,此时脚本是在音频服务器上的,我应该提供一个API让外面能调用,以生成自己的音频文件。
使用SpringBoot编写一个Controller接口,接收两个参数,内容和文件名
@Slf4j
@RestController
@RequestMapping("/speech")
public class TestController {
    private String redisKey = "TXT2WAV";
    @Autowired
    private RedisTemplate redisTemplate;
    @GetMapping("/test")
    public String test(@RequestParam("id") String id, @RequestParam("content") String content) {
        if(StrUtil.isEmptyIfStr(id)) {
            return "ID错误";
        }
        if(StrUtil.isEmptyIfStr(content)) {
            return "内容错误";
        }
        Map<String, String> map = new HashMap<>();
        String key = id;
        map.put(key, content);
        redisTemplate.boundHashOps(redisKey).putAll(map);
        return DateUtil.now();
    }
}
这里并没有直接进行脚本调用,因为音频生成的脚本调用是非常耗时的,不能堵塞的调用,所以我们先放到Redis中缓存起来。
然后我们用一个定时器,定时处理这些需要处理的任务
@Slf4j
@Service
public class MainJob {
    @Autowired
    private RedisTemplate redisTemplate;
    private String redisKey = "TXT2WAV";;
    private String SCRIPT_PATH = "/home/www/speech/speech.sh";
    // 它的间隔时间是根据上次的任务结束的时候开始计时的。
    // 比如一个方法上设置了fixedDelay=5*1000,那么当该方法某一次执行结束后,开始计算时间,
    // 当时间达到5秒,就开始再次执行该方法。
    // 加上注解@EnableAsync(类上)和@Async(方法上),加了注解以后,就开启了多线程模式,
    // 当到了下一次任务的执行时机时,如果上一次任务还没执行完,就会自动创建一个新的线程来执行它。
    // 异步执行也可以理解为保证了任务以固定速度执行。
    @Scheduled(fixedRate = 10 * 1000)
    public void doTxt2Wav() {
        System.out.println("开始执行 文字转语音 数据来源 Redis -> " + DateUtil.now());
        try {
            Set<String> keys = redisTemplate.boundHashOps(redisKey).keys();
            if (null != keys && !keys.isEmpty()) {
                for (String key : keys) {
                    String txt = redisTemplate.boundHashOps(redisKey).get(key).toString();

                    int exitCode = executeScript(key, txt);
                    log.info("执行ID:{},返回:{}", key, exitCode);
                    if(0 == exitCode) {
                        // 移除元素
                        redisTemplate.boundHashOps(redisKey).delete(key);
                    }
                }
            }
        } catch (Exception e) {
            log.error("处理文字转语音时异常", e);
        }
    }
    public int executeScript(String id, String txt) throws Exception {
        log.info("开始处理:ID-{},内容:{}", id, txt);
        // 构建命令数组,包括脚本路径和参数
        String[] command = {SCRIPT_PATH, id, txt};
        // 创建ProcessBuilder实例
        ProcessBuilder processBuilder = new ProcessBuilder(command);
        // 启动进程
        Process process = processBuilder.start();
        // 可选:读取脚本输出
        BufferedReader reader = new BufferedReader(new InputStreamReader(process.getInputStream()));
        String line;
        while ((line = reader.readLine()) != null) {
            log.info(line);
        }
        // 等待脚本执行结束
        int exitCode = process.waitFor();
        return exitCode;
    }
}
上述代码,就是从Redis缓存中读取需要执行的任务,然后调用脚本生成对应的文件。
上面的脚本,就是把文件生成到我们站点的目录,所以调用成功后,对外就可以直接播放该音频文件。
然后我们启动该Jar程序,来启动对外接口
nohup java -Xmx512M -Xms512M -jar /home/www/speech/springBoot.jar
    >> /home/www/speech/88888.log 2>&1 &
通过URL调用:http://localhost:8080/speech/test?id=123465&content=你好 。