pushlet 之 官方示例解读与改造
96440 开源 | 2014-8-12-
下载pushlet-2.0.4,解压后文件夹内有一些目录!
我们只关心 src 源文件,和 webapps 示例工程。将 pushlet.war 拷贝到Tomcat部署目录下,启动Tomcat,可以看示例工程!
示例工程有三个,我们打开 Pushlet Demos ,然后看到有许多可以进行测试的示例,点开 Basics 查看!
选择消息推送方式,然后选择订阅的主题,页面会显示后台推送的消息!
下面我们来新建一个工程,来自己手动建立一个测试示例工程!
为了查看更明显,不再拷贝Jar包而是拷贝源码!

log4j.properties,pushlet.properties,sources.properties,style.css,均拷贝自部署后Tomcat工程下的 pushlet 文件夹!
其中JS文件夹里面的内容其实是 pushlet 下 lib 下的内容,为了规范和统一特更名!
首先我们要修改一下 js-pushlet-client.js ,这个JS文件内取得系统跟路径的方法会有问题,所以在此更改一下!
原来的方法:
function getWebRoot() {
 if (pushletWebRoot != null) {
  return pushletWebRoot;
 }
 var head = document.getElementsByTagName('head')[0];
 var nodes = head.childNodes;
 for (var i = 0; i < nodes.length; ++i) {
  var src = nodes.item(i).src;
  if (src) {
   var index = src.indexOf("js-pushlet-client.js");
   if (index >= 0) {
    pushletWebRoot = src.substring(0, index);
    break;
   }
  }
 }
 return pushletWebRoot;
}
更改为:
//js获取项目根路径,如: http://localhost:8083/nms
function getWebRoot(){
    //获取当前网址,如: http://localhost:8083/nms/share/meun.jsp
    var curWwwPath=window.document.location.href;
    //获取主机地址之后的目录,如: nms/share/meun.jsp
    var pathName=window.document.location.pathname;
    var pos=curWwwPath.indexOf(pathName);
    //获取主机地址,如: http://localhost:8083
    var localhostPaht=curWwwPath.substring(0,pos);
    //获取带"/"的项目名,如:/nms
    var projectName=pathName.substring(0,pathName.substr(1).indexOf('/')+1);
    return(localhostPaht+projectName+"/");
}
如果按照原来的方式,则程序写的太死,不方便维护!
然后就是我们访问的页面 http://localhost:8080/pushlet/examples/raw/raw.html ,他的页面是英文的,可能有的人看的很麻烦!
虽然我的英文不怎么样,但是还是自我牺牲一下吧,翻译的不好的尽管板砖!
其实就是把里面的HTML内容拷贝到新建工程的 index.jsp 中:
<%@ page language="java" import="java.util.*" pageEncoding="UTF-8"%>
<html>
<%
String path = request.getContextPath();
String basePath = request.getScheme()+"://"+request.getServerName()+":"+request.getServerPort()+path+"/";
%>
<head>
 <title>消息推送模式与内容测试</title>
 <meta http-equiv="Content-Type" content="text/html; charset=UTF-8">
 <link href="style.css" rel="stylesheet">
 <meta http-equiv="Pragma" content="no-cache">
 <script type="text/javascript" src="<%=basePath %>js/pushlet_js/js-pushlet-client.js"></script>
    <script type="text/javascript">
      var subscriptionId = null;
        // 加入或离开
  function joinLeave(what) {
   if (what == 'joinStream') {
     p_join_listen(null, 'stream');
   } else if (what == 'joinPull') {
     p_join_listen(null, 'pull');
   } else if (what == 'joinPoll') {
     p_join_listen(null, 'poll');
      } else if (what == 'leave') {
     p_leave();
     subscriptionId = null;
     displayData('无消息或离开状态');
      }
  }
  // 产生消息
  function onData(event) {
   // Write the event as HTML table into content Element
     // p_debug(flag, "pushlet-app", 'event received subject=' + event.getSubject() );
   displayData(event.toString());
  }
  // 主题订阅成功
  function onSubscribeAck(event) {
   subscriptionId = event.get('p_sid');
   displayControl(event.toString());
   displayData('订阅成功,等待消息');
     }
     // Ack refresh
  function onRefreshAck(event) {
   displayData(event.toString());
     }
     // Heartbeat on data channel
  function onHeartbeat(event) {
   displayData(event.toString());
     }
  // 主题取消订阅成功
  function onUnsubscribeAck(event) {
   subscriptionId = null;
   displayControl(event.toString());
   displayData('取消订阅成功,无消息');
    }
  // 捕获其他返回信息
  function onEvent(event) {
   displayControl(event.toString());
  }
  // 订阅主题
  function subscribeUnsubscribe(subject) {
      if (p_getSessionId() == null) {
        alert('请先选择加入模式');
        return;
      }
      if (subject == 'UNSUBSCRIBE') {
         // Unsubscribe all
      p_unsubscribe();
   } else if (subject != '') {
    // Unsubscribe first if already subscribed
    if (subscriptionId != null) {
     p_unsubscribe(subscriptionId);
    }
    p_subscribe(subject, 'mylabel');
   }
   }
  // 选择调试
  function setDebug(value) {
   if (value == 'none') {
    p_setDebug(false);
   } else if (value == 'full') {
    p_setDebug(true);
   } else if (value == 'net') {
    p_setDebug(false);
    p_setNetDebug(true);
   }
   }
   function displayData(aString) {
     document.dataEventDisplay.event.value = aString;
  }
     function displayControl(aString) {
     document.controlEventDisplay.event.value = aString;
  }
 </script>
</head>
<body>
  <h2>消息推送测试</h2>
  <p>通过以下表单控制消息服务</p>
  <table border="0" cellpadding="0" cellspacing="0" >
    <tr>
    <td>
       <h3>加入/离开</h3>
     </td>
     <td>
       <h3>主题</h3>
     </td>
      <td>
       <h3>调试窗口</h3>
     </td>
    </tr>
    <tr>
    <td>
       <form name="joinForm">
         <select name="joinField" onChange="joinLeave(this.value)">
           <option selected value="" >请选择</option>
           <option value="joinStream">加入 (stream mode)</option>
           <option value="joinPull">加入 (pull mode)</option>
           <option value="joinPoll">加入 (poll mode)</option>
           <option value="leave">离开</option>
         </select>
       </form>
     </td>
     <td>
       <form name="subscribeForm">
         <select name="selectField" onChange="subscribeUnsubscribe(this.value)">
           <option selected value="" >选择主题</option>
           <option value="/system">系统信息</option>
           <option value="/temperature">天气情况</option>
           <option value="/stocks">网络连接</option>
           <option value="/stocks,/temperature">多主题订阅</option>
           <option value="/">所有消息</option>
          <option value="UNSUBSCRIBE">卸载主题</option>
          </select>
       </form>
     </td>
      <td>
        <form name="debugForm">
          <select name="selectField" onChange="setDebug(this.value)">
           <option selected value="none" >无调试</option>
           <option value="full">所有调试</option>
           <option value="net">进调试网络</option>
          </select>
        </form>
     </td>
    </tr>
  </table>
<h3>控制和监控</h3>
<p>
以下是事件监听情况,你需要先加入才能看到效果
</p>
<form name="controlEventDisplay">
  <table border="2" bordercolor="white" cellpadding="0" cellspacing="0" >
    <tr>
     <td>
       <textarea cols="40" rows="8" name="event">
        等待消息
       </textarea>
     </td>
    </tr>
  </table>
</form>
<h3>消息监控</h3>
<p>
以下是事件产生的消息内容,你需要选择主题后才能看到消息内容
</p>
<form name="dataEventDisplay">
  <table border="2" bordercolor="white" cellpadding="0" cellspacing="0" >
    <tr>
     <td>
       <textarea cols="60" rows="10" name="event">
        没有消息
       </textarea>
     </td>
    </tr>
  </table>
</form>
<script type="text/javascript">p_embed()</script>
</body>
</html>
别忘记了工程需要日志记录的log4j包!运行后看到效果:
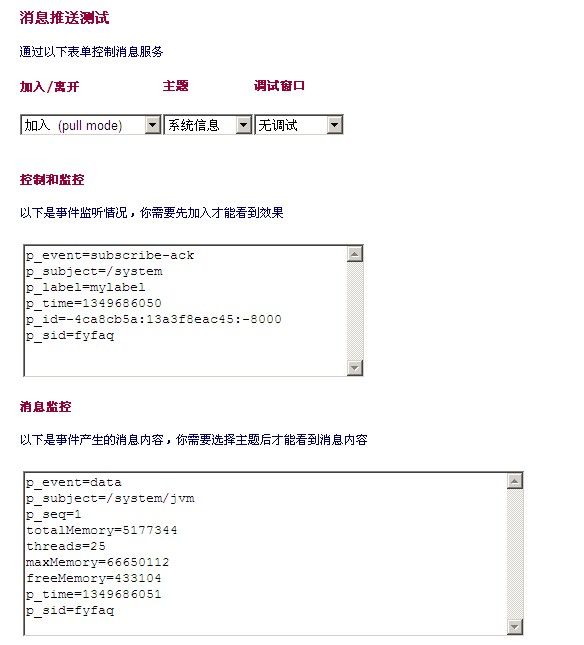
选择一个加入模式,选择一个主题,会看到后台推送的消息内容!
解说:
消息来源是定义在sources.properties中:
source1=nl.justobjects.pushlet.test.TestEventPullSources$TemperatureEventPullSource
source2=nl.justobjects.pushlet.test.TestEventPullSources$SystemStatusEventPullSource
source3=nl.justobjects.pushlet.test.TestEventPullSources$PushletStatusEventPullSource
source4=nl.justobjects.pushlet.test.TestEventPullSources$AEXStocksEventPullSource
source5=nl.justobjects.pushlet.test.TestEventPullSources$WebPresentationEventPullSource
source6=nl.justobjects.pushlet.test.TestEventPullSources$PingEventPullSource
以上是示例自带的消息源
获取消息的步骤:
通过 p_join_listen 方法加入监听,加入模式有三种:stream,pull,poll
通过 p_leave 方法取消事件监听
通过 p_subscribe 方法订阅主题
通过 p_unsubscribe 方法取消订阅的主题
在操作过程中,会触发一些事件,例如订阅成功,取消主题订阅等消息通知,和有消息推送时触发的 onData 方法!
获取消息:
示例打印在页面时直接使用了 event.toString() !
我们也看到了他打印的内容:
p_event=data
p_subject=/system/jvm
p_seq=1
totalMemory=5177344
threads=25
maxMemory=66650112
freeMemory=433104
p_time=1349686051
p_sid=fyfaq
一个Key一个Value,如果想要获得某个值,查看手把手示例!
event.get("mess");附件:
推荐您阅读更多有关于“ java Pushlet comet server JavaScript ”的文章
-
猜你喜欢
- 个人资料
-

Java小强
未曾清贫难成人,不经打击老天真。
自古英雄出炼狱,从来富贵入凡尘。
- 站内搜索
-
- 文章分类
- 最新文章
- 热门文章
发表评论: