SpringBoot进行文件上传和多文件上传
52750 框架 | 2021-4-10-
如何在springboot工程作为服务器,去接收通过http 上传的multi-file的文件。
创建一个springmvc工程你需要spring-boot-starter-thymeleaf和 spring-boot-starter-web的起步依赖。为例能够上传文件在服务器,你需要在web.xml中加入
标签做相关的配置,但在sringboot 工程中,它已经为你自动做了,所以不需要你做任何的配置。 
因为项目中使用thymeleaf来渲染页面,引入thymeleaf
<!-- ______________________________________________ thymeleaf -->
<dependency>
	<groupId>org.springframework.boot</groupId>
	<artifactId>spring-boot-starter-thymeleaf</artifactId>
</dependency>
配置文件需要定义的配置
# 上传文件大小控制
spring.http.multipart.max-file-size=128KB
spring.http.multipart.max-request-size=128KB
# thymeleaf
spring.thymeleaf.cache = false
spring.thymeleaf.check-template = true
spring.thymeleaf.check-template-location = true
spring.thymeleaf.content-type = text/html
spring.thymeleaf.enabled = true
spring.thymeleaf.encoding = UTF-8
spring.thymeleaf.prefix = classpath:/templates/
spring.thymeleaf.suffix = .html
写一个控制类,有进入首页,单文件上传和多文件上传
package com.example.demo.controller;

import java.io.File;
import java.util.List;

import javax.servlet.http.HttpServletRequest;

import org.springframework.stereotype.Controller;
import org.springframework.ui.Model;
import org.springframework.web.bind.annotation.GetMapping;
import org.springframework.web.bind.annotation.PostMapping;
import org.springframework.web.bind.annotation.RequestParam;
import org.springframework.web.multipart.MultipartFile;
import org.springframework.web.multipart.MultipartHttpServletRequest;
import org.springframework.web.servlet.mvc.support.RedirectAttributes;

import com.example.demo.util.UUID;

/**
 * 文件上传测试类
 */
@Controller
public class FileUploadController {

	@GetMapping("/uploadIndex")
	public String fileUploadIndex() {
		return "upload";
	}

	@PostMapping("/uploadFile")
    public String handleFileUpload(@RequestParam("file") MultipartFile file, Model model, RedirectAttributes redirectAttributes) {
		String fileName = file.getOriginalFilename();
        String filePath = "D:\\temp\\";
        File dest = new File(filePath + UUID.getUUID() + fileName.substring(fileName.lastIndexOf(".")));
        try {
        	// 可以按照日期生成文件,按照自定义规则生成文件名
            file.transferTo(dest);
            redirectAttributes.addFlashAttribute("message", "文件: " + file.getOriginalFilename() + " 上传成功");
        } catch (Exception e) {
        	e.printStackTrace();
        	redirectAttributes.addFlashAttribute("message", "文件: " + file.getOriginalFilename() + " 上传失败");
        }
        return "redirect:/uploadIndex";
    }

	@PostMapping("/multiUpload")
	public String multiUpload(HttpServletRequest request, Model model, RedirectAttributes redirectAttributes) {
		List<MultipartFile> files = ((MultipartHttpServletRequest) request).getFiles("file");
		String filePath = "D:\\temp\\";
		StringBuffer sb = new StringBuffer("");
		for (int i = 0; i < files.size(); i++) {
	        MultipartFile file = files.get(i);
	        String fileName = file.getOriginalFilename();
	        File dest = new File(filePath + UUID.getUUID() + fileName.substring(fileName.lastIndexOf(".")));
	        try {
	        	// 可以按照日期生成文件,按照自定义规则生成文件名
	            file.transferTo(dest);
	            sb.append("文件: " + file.getOriginalFilename() + " 上传成功。");
	        } catch (Exception e) {
	        	e.printStackTrace();
	        	sb.append("文件: " + file.getOriginalFilename() + " 上传失败。");
	        }
		}
		redirectAttributes.addFlashAttribute("message", sb.toString());
		return "redirect:/uploadIndex";
	}

}
页面upload.html代码如下
<html xmlns:th="http://www.thymeleaf.org">
<body>
	<div th:if="${message}">
		系统提示:<h2 th:text="${message}" />
	</div>
	<div>
		<form method="POST" enctype="multipart/form-data" action="/uploadFile">
			<table>
				<tr>
					<td>选择文件:</td>
					<td><input type="file" name="file" /></td>
				</tr>
				<tr>
					<td></td>
					<td><input type="submit" value="上传" /></td>
				</tr>
			</table>
		</form>
		<form method="POST" enctype="multipart/form-data" action="/multiUpload">
			<table>
				<tr>
					<td>选择文件1:</td>
					<td><input type="file" name="file" /></td>
				</tr>
				<tr>
					<td>选择文件2:</td>
					<td><input type="file" name="file" /></td>
				</tr>
				<tr>
					<td>选择文件3:</td>
					<td><input type="file" name="file" /></td>
				</tr>
				<tr>
					<td></td>
					<td><input type="submit" value="多文件上传" /></td>
				</tr>
			</table>
		</form>
	</div>
</body>
</html>
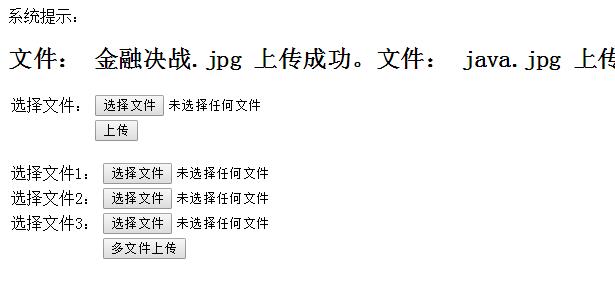
效果效果如下

END
推荐您阅读更多有关于“ 文件上传 springboot thymeleaf multipart ”的文章
-
猜你喜欢
- 个人资料
-

Java小强
未曾清贫难成人,不经打击老天真。
自古英雄出炼狱,从来富贵入凡尘。
- 站内搜索
-
- 文章分类
- 最新文章
- 热门文章
发表评论: